


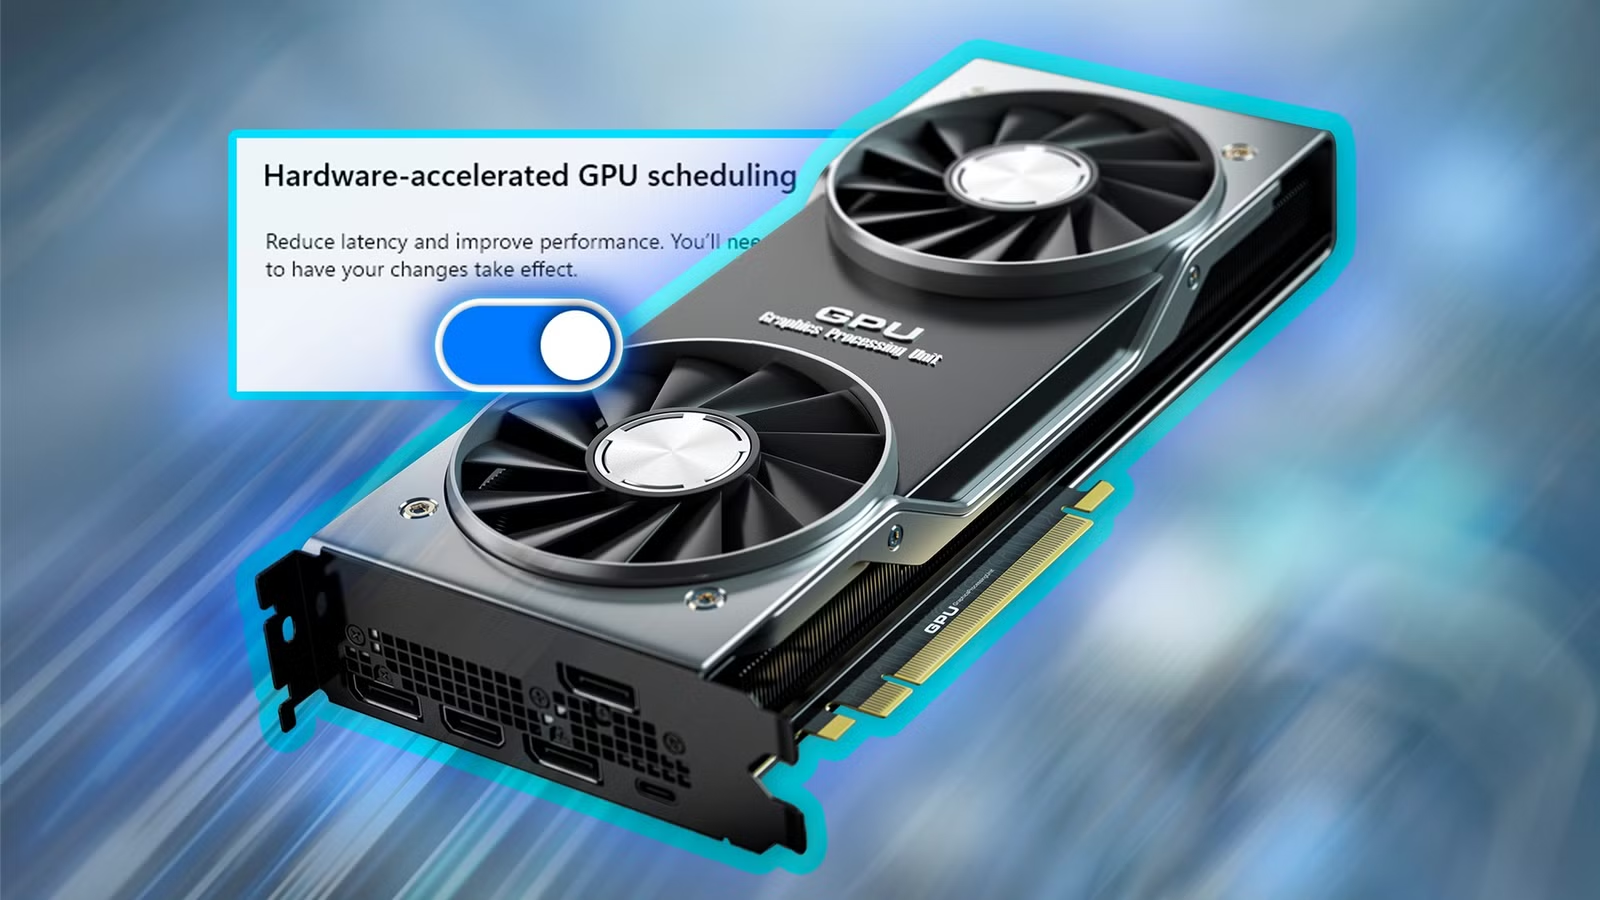
Windows 10 and Windows 11 include an advanced feature called Hardware-Accelerated GPU Scheduling. It allows your graphics card to handle certain scheduling tasks more directly, which can help improve gaming and video performance on supported systems.
Enabling the feature may provide a small performance boost and can also help modern GPUs take better advantage of newer graphics capabilities. Here’s how to turn it on and check whether your PC supports it.
What Is Hardware-Accelerated GPU Scheduling (HAGS)?
Normally, your CPU helps manage graphics workloads by organizing frame data, assigning tasks, and sending instructions to the GPU in the order they need to be processed. This system works well, but it also means the CPU has to spend time managing graphics-related scheduling.
With Hardware-Accelerated GPU Scheduling (HAGS) enabled, more of that scheduling work is handled directly by the GPU and its VRAM. This can reduce some of the workload on the CPU, lower latency in certain situations, and potentially improve overall system or gaming performance.
Should You Enable Hardware-Accelerated GPU Scheduling?
If your graphics card supports Hardware-Accelerated GPU Scheduling, enabling it is generally worth trying. The feature can help reduce CPU overhead and may improve performance during demanding tasks such as gaming, video editing, and other graphics-intensive workloads.
HAGS is also required for certain modern GPU features, including NVIDIA DLSS Frame Generation, and it can work alongside technologies such as AMD FSR to improve gaming performance.
However, results can vary depending on your hardware and drivers. If you notice crashes, visual glitches, unstable apps, or other graphics-related problems after enabling HAGS, you may be better off turning it back off. Fortunately, the setting is easy to disable if it causes issues.
What You Need to Make Hardware-Accelerated GPU Scheduling Work
Hardware-Accelerated GPU Scheduling was introduced with the Windows 10 May 2020 Update. On some Windows 10 systems, the feature may still be turned off unless you enable it manually. If you upgrade from Windows 10 to Windows 11, your existing setting may carry over, while fresh Windows 11 installations may enable it automatically on supported hardware.
Your PC also needs a compatible graphics card and up-to-date GPU drivers. Supported hardware generally includes newer NVIDIA and AMD graphics cards, although exact compatibility can depend on your GPU model and driver version.
There is no single CPU and GPU combination that guarantees the biggest performance improvement from HAGS. Results can vary depending on your processor, graphics card, drivers, games, and applications.
Before enabling the feature, it is a good idea to update your graphics drivers. Once that is done, you can turn on Hardware-Accelerated GPU Scheduling through the graphics settings in Windows 10 or Windows 11.
Enable Hardware-Accelerated GPU Scheduling in Windows 11
To turn on Hardware-Accelerated GPU Scheduling in Windows 11, press Windows + I to open the Settings app. Next, go to System and select Display from the right side of the window.
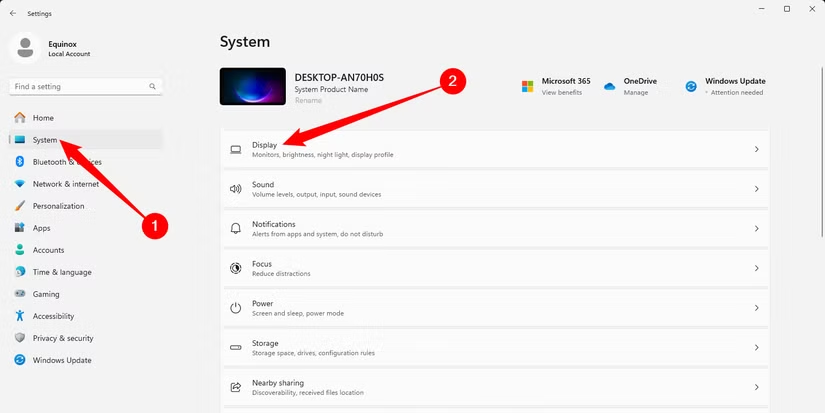
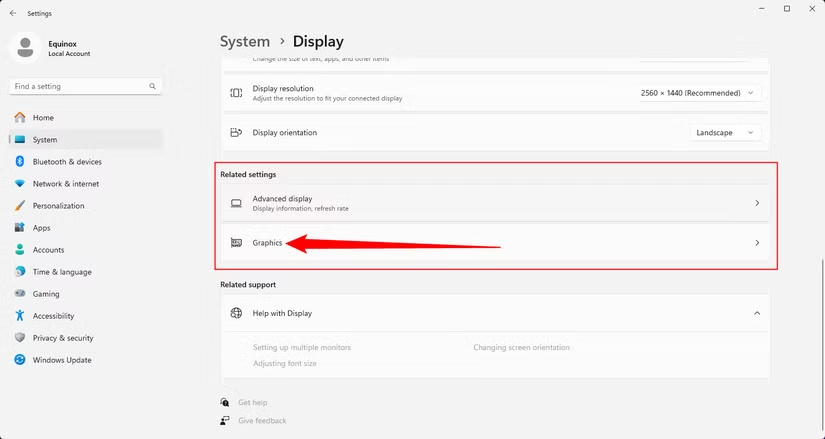
From the “Related Settings” section, select “Graphics.”
Next, click Advanced Graphics Settings. Turn on the switch next to Hardware-Accelerated GPU Scheduling. If a User Account Control prompt appears, click Yes to confirm the change.
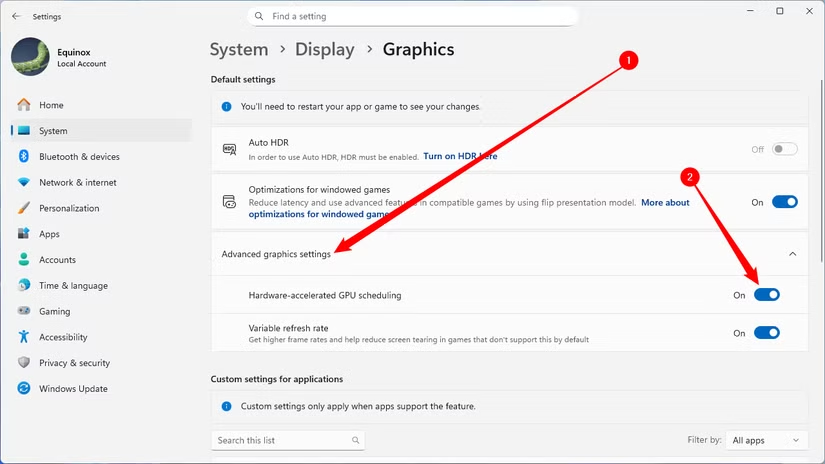
Note: If you want to turn the feature off later, simply return to the same menu and disable Hardware-Accelerated GPU Scheduling.
Once the setting is enabled, close the Settings app and restart your PC so the change can take effect.
You may not notice a major difference right away, as the performance impact can vary from one system to another. If you experience lower performance, instability, or graphics-related problems, you can disable the feature again.
After restarting, test a few games or demanding apps to see whether Hardware-Accelerated GPU Scheduling improves performance on your Windows 11 PC.
Turn On Hardware-Accelerated GPU Scheduling in Windows 10
There are two main ways to enable Hardware-Accelerated GPU Scheduling in Windows 10: through the Settings app or by using the Registry Editor. Both methods can turn on the same feature, but using Settings is usually the simpler and safer option for most users.
Using Settings
Start by opening the Settings app on your Windows 10 PC. The quickest way is to press Windows + I on your keyboard.
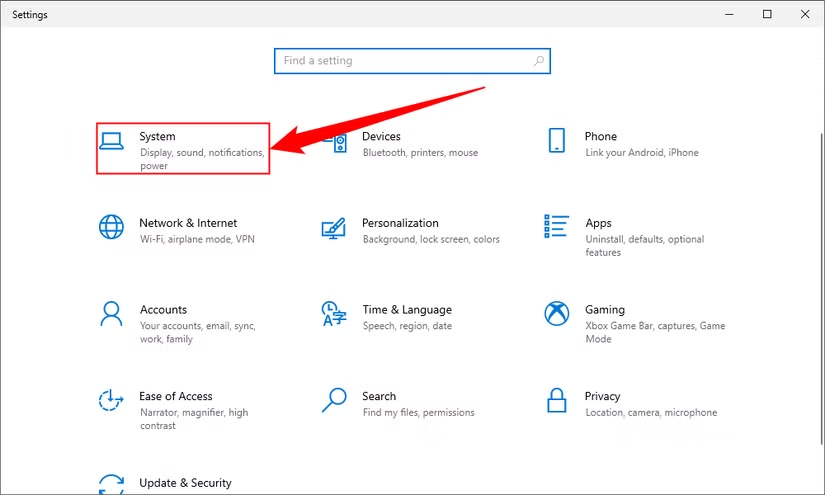
In Settings, select “System.”
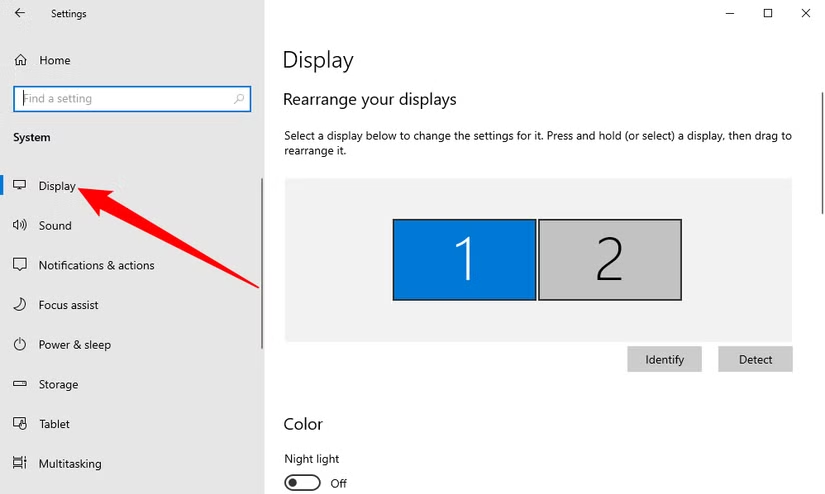
In the sidebar on the left, click “Display.”
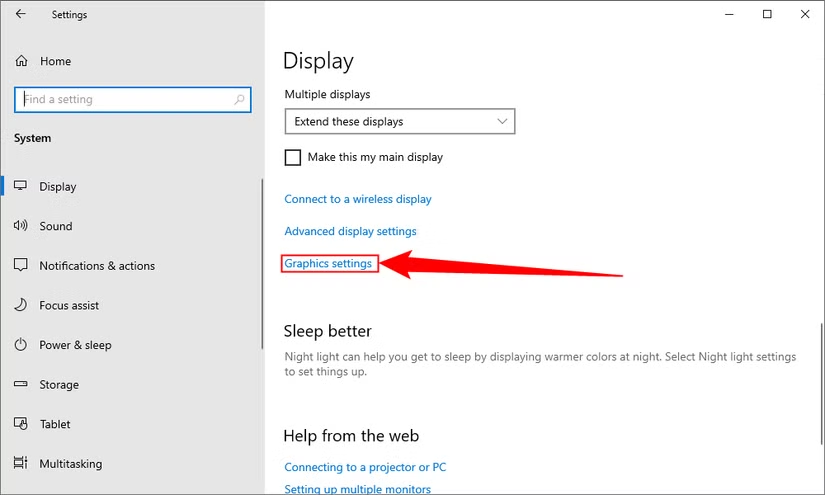
On the right pane, at the bottom, choose “Graphics Settings.”
On the following screen, toggle on the “Hardware-Accelerated GPU Scheduling” option.
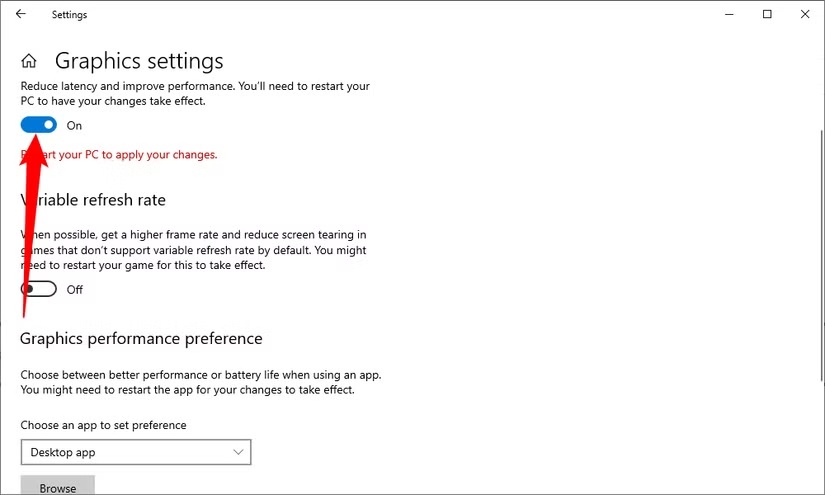
Note: If you want to disable the feature later, return to the same setting and switch Hardware-Accelerated GPU Scheduling off.
After making the change, close the Settings app and restart your PC so the new setting can take effect.
Using the Registry Editor
To enable Hardware-Accelerated GPU Scheduling through the Registry Editor, press Windows + R to open the Run dialog. Type regedit and press Enter.
If a User Account Control prompt appears, click Yes to allow the Registry Editor to make changes.
Once Registry Editor opens, enter the following path in the address bar at the top and press Enter:
Computer\HKEY_LOCAL_MACHINE\SYSTEM\CurrentControlSet\Control\GraphicsDrivers
In the pane on the right, double-click “HwSchMode.”
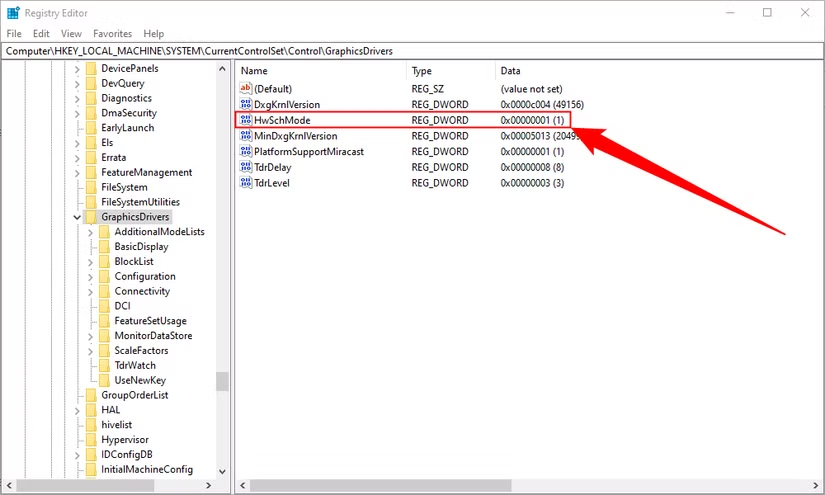
On the entry edit box, select the “Value Data” field and enter 2. In the “Base” section, choose “Hexadecimal.” Then, select “OK.”

Note: If you want to disable Hardware-Accelerated GPU Scheduling later, return to the same registry entry, set the Value Data to 1, keep Hexadecimal selected, and click OK.
After making the change, close the Registry Editor and restart your PC for the new setting to take effect.
Frequently Asked Questions
What is Hardware-Accelerated GPU Scheduling in Windows?
Hardware-Accelerated GPU Scheduling, or HAGS, allows the GPU to handle more of its own scheduling work instead of relying heavily on the CPU. This can reduce CPU overhead and may improve graphics performance and latency.
How do I enable Hardware-Accelerated GPU Scheduling in Windows 11?
Open Settings > System > Display > Graphics > Advanced Graphics Settings, then turn on Hardware-Accelerated GPU Scheduling. Restart your PC to apply the change.
How do I enable Hardware-Accelerated GPU Scheduling in Windows 10?
Open Settings > System > Display > Graphics Settings, then enable Hardware-Accelerated GPU Scheduling if the option is available. Restart your computer afterward.
Why can’t I see the Hardware-Accelerated GPU Scheduling option?
The option may be missing if your graphics card, Windows version, or GPU driver does not support the feature. Updating Windows and your graphics drivers may help.
Does Hardware-Accelerated GPU Scheduling improve gaming performance?
It can improve performance or reduce latency in some games and applications, but the results vary depending on your CPU, GPU, drivers, and software.
Should I keep Hardware-Accelerated GPU Scheduling enabled?
If your system supports it and you do not experience any problems, keeping it enabled is generally fine. If you notice crashes, stuttering, visual glitches, or reduced performance, try disabling it.
Do I need to restart my PC after enabling Hardware-Accelerated GPU Scheduling?
Yes. Restarting your computer ensures the setting is fully applied before you test games, apps, or other graphics-intensive tasks.
Conclusion:
Hardware-Accelerated GPU Scheduling can help Windows 10 and Windows 11 manage graphics workloads more efficiently by allowing the GPU to handle more scheduling tasks directly. If your hardware supports the feature, enabling it may improve gaming, video editing, and other graphics-heavy activities.
Performance gains can vary from one PC to another, so it is worth testing the setting on your system. If you notice crashes, stuttering, or other graphics problems, you can easily disable it again.
